
Yesterday we featured First Impressions Molds LLC as our Spotlight vendor of the week, with the promise to tell you more about silicone molds today, so here we go.
Silicone molds are used with fondant and gum paste, as well as a myriad of other mediums, to create decorations for cakes. Pastry chefs like Duff Goldman, Lauri Ditunno, and others use them to make life easier when they need a specific type of decoration that can be difficult to make.
Purchasing silicone molds is the easiest way to go. Site like First Impressions specialize only in molds, but you can also get them at site like Global Sugar Art, NY Cake, and others. (See our list of favorite website in the right side bar of this site for more vendor suggestions.) The molds come in a host of shapes and sizes, so if you search enough, you should find just what you need.
To use a silicone mold is super easy. Here are how-to instructions courtesy of First Impressions:
How-to
"Take a piece of sugarpaste that you think will be enough to just fill the mold, knead it until it is smooth and roll it into a ball. Take a dusting puff* and dust the ball, then press it into the mold, making sure you capture all the detail and any undercuts*.
You can dust the top as you press the sugarpaste in if it begins to feel sticky. If you have excess paste after filling the mold you can either cut it off with a pair of scissors (careful not to clip the mold), pinch it off, or run a straight edge spatula across the top to remove the excess, then smooth it again.
If the mold is deep, highly detailed or has undercuts, you must place the filled mold into the refrigerator or freezer for 15-30 minutes depending on how deep the mold is to allow the sugarpaste to set firm and to make for easy de-molding.
De-molding:
After you have pressed your sugarpaste into the mold, you can simply pop the piece out by gently holding the mold with your thumbs on top and fingers on the bottom of the mold and flexing it out and up.
If you have placed the filled mold into the refrigerator or freezer simply remove it and de-mold, then place the finished piece on waxed paper to air dry.
* Dusting puff - fill the foot of one knee-high pair of pantyhose with a 1/4 cup of cornstarch, then tie it and cut off the excess, leaving about an inch extra at the top for holding onto.
* Undercuts - portions of the piece that are deeper into the bottom or side of the mold than the rest."
* Dusting puff - fill the foot of one knee-high pair of pantyhose with a 1/4 cup of cornstarch, then tie it and cut off the excess, leaving about an inch extra at the top for holding onto.
* Undercuts - portions of the piece that are deeper into the bottom or side of the mold than the rest."
If you search for a mold and just can't find what you want, perhaps you need something unique and specific to a project, then the way to go is by making your own mold. That is when a site like MYOM.com (Make Your Own Molds) comes in handy. There you can find mold making kits, videos, and supplies and accessories to get the job done.
Below are some molds that we own which make life easier, and even a couple we have on our wish list - that is, we wish we'd had them when we made a cake that featured just that decoration!!
Happy baking!
Christina & Meghan
 | ||||||
| We own this mold and use it with isomalt to make realistic-looking gems when needed. |
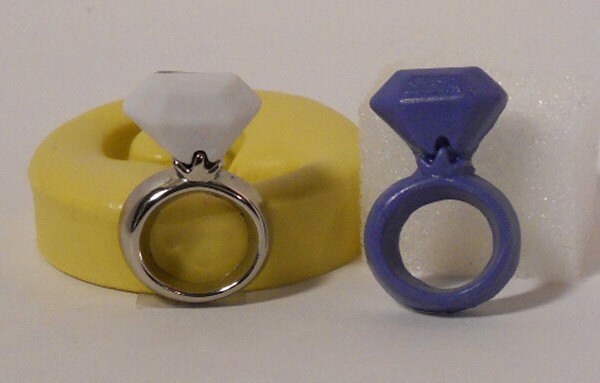 |
| Where, oh where, was this mold last summer when we were attempting make an engagement ring topper for a cake?!?? |
 |
| These drop beads make a beautifully elegant decoration! |
 |
| Pearl borders have never been easier since we purchased this mold!! No more messy piping bags and aching hands! |
* Dusting puff - fill the foot of one knee-high pair of pantyhose with a 1/4 cup of cornstarch, then tie it and cut off the excess, leaving about an inch extra at the top for holding onto.
* Undercuts - portions of the piece that are deeper into the bottom or side of the mold than the rest."
No comments:
Post a Comment