Monday, June 13, 2011

Wii Mario Kart cake, Decorate-Your-Own cake, baby shower cookies and more!

May and June are always busy cake months for us, which is why we have been too swamped to post lately.  Nonetheless, we wanted to share some of what we have been up to as well as some up-coming projects too. 

For Memorial Day weekend, we delivered this cake for twins turning one to North Jersey.  The party theme was Safari, and the cakes were vanilla with pistachio whipped cream filling and chocolate with chocolate buttercream.

Safari-themed first birthday cake for twins, Noura & Samir.

The following week, Christina's youngest and oldest children celebrated their 5th and 9th birthdays, respectively.  Aidan, the 5-year old, requested a Wii Mario Kart cake, while Mandara, the 9-year old, requested individual mini cakes for her three best friends, her sister, and her to decorate on their own.  Here is Aidan's cake as well as all five mini cakes, both in progress and done. 

Wii Mario Kart cake for Christina's son, Aidan.

The girls working on their individual mini cakes.


This past weekend, we had 40 baby shower cookie favors to make.  Each sugar cookie was a unique baby onesie in yellow, blue, green, and orange individually bagged with "It's a Boy!" ribbon in blue.


This week we have two small graduation cakes as well as an annual cake for the Peer Leaders in our middle school.  And next week, we are swamped!  180 cupcake wedding favors, a football-themed groom's cake, and a pirate's treasure box cake too!  Phew! 

Stay tuned for those pictures soon!

Happy baking!
Christina & Meghan

Tuesday, May 24, 2011

Change of format and cakes too!

We've been MIA for a couple of weeks, just super busy with end-of-the-year school things as well as cake and just life in general.  Our schedule always gets hectic at this time of the year, so we mulled it over, and decided that posting every day just doesn't work for us as teachers and parents.  We are going back to our regular format of posting whenever we have something to share, be it cakes we've done, cake news, or whatever inspires us. 

We hope that you will still check in with us regularly to see what we are up to and what we've posted recently.  Honestly, blogging is a full time job, and we both already have one of those!!

Here are two cakes Christina made for her cousins, a brother and sister.  The first is Andy's Derek Jeter Yankee jersey cake, which was vanilla cake with vanilla pudding and strawberries.   Next is his sister Melanie's Sweet 16 cake.  It was a glamorous girly cake for a glamorous girl!  The inside was vanilla cake with vanilla pudding and strawberries for the bottom layer, and vanilla cake with chocolate pudding for the top layer. 

Andy and Mel loved their cakes, and we hope you do too!


Happy baking!
Christina & Meghan

P.S.  Stay tuned this weekend for a Safari theme first birthday cake for twins!

Wednesday, May 18, 2011

Temporarily down!

Due to a super busy week as well as technical issues, we are temporarily down but will be back up next week (hopefully).  Thanks for hanging in there with us!

Happy baking!
Christina & Meghan

Saturday, May 14, 2011

Basic supply list for cake decorating

Sitting here, half asleep, sipping my coffee at 6:52 am this cloudy Saturday morning, it suddenly struck me that once again, I forgot to get a box to transport my latest cake! 

Grrr...

This has happened more often than I care to admit as of late.  I blame my darned allergies for clouding my ability to think clearly, but nonetheless, the forgetfulness must stop!  I have visited Sweet N Fancy (our local cake decorating supply store) so often this week, the wonderful ladies there don't even miss a beat when I come in. 

"Back again?" they greet me with a smile. 

Not good.

So as I sit here, I have decided to make a list of basic supplies that each cake we make requires so that maybe, just maybe, I won't forget so many things in the future.  Think of it as a master checklist, with room to customize it for specific projects.  (If my husband reads this, he will definitely tease me, as I am the queen of checklists and my talent/obsession has rubbed off on him!)

Basic Cake Decorating Project Checklist:

  • design/inspirations ideas and pictures
  • cake drum (AKA base board)
  • cardboard cake boards (for multiple layers)
  • cake box (for final transport)
  • ingredients for baking cake
  • cake pans
  • filling ingredients
  • butter cream (for filling, piping dams, and skim coating)
  • pastry bags (disposable and non-disposable)
  • scissors
  • ruler
  • decorating tips
  • spatulas
  • scraper/smoother
  • rolling pin(s)
  • sugar shaker (filled with confectioner's sugar)
  • fondant
  • gel paste(s)
  • fondant smoother
  • pastry wheel
  • support dowels (if stacking)
  • fondant tools & cutters
  • paint brushes
  • dusting powders
  • vodka
  • air brush machine

Since it is only 6:52 am, I may have forgotten something, but I am fairly certain that these are all of the basic things I haul out each and every time I work on any cake, so if you think of anything, be sure to drop us a line!

Happy baking!
Christina

Wednesday, May 11, 2011

Wacky Cakes Wednesday!

Realistic cakes such as this one always get us.  Would YOU want to eat Fido (or Mitch)?  But in fairness, this cake is absolutely awesome and the creator is a cake goddess!  Woof, woof!


Happy baking!
Christina & Meghan

Tuesday, May 10, 2011

Terrific Tool Tuesday: Cake decorating dusts!

This Terrific Tool feature was a tough one to write because when we decided to do cake decorating dusts, it seemed as thought we couldn't just talk about that and be done with it!

Let's start with the basics.  Cake decorating dusts are special edible dusts just for cake decorating.  They contain only non-toxic ingredients and are perfect for use on gum paste, rolled fondant flowers, and so much more.  They can be used in dry form, as the name suggests, but can also be mixed with oil-based flavorings or alcohol (like vodka) for painting and highlighting.  

There are many types:  luster dust (give subtle colors with a high sheen metallic-like finish), petal dust (used to achieve deep hues with a matte finish on gum paste flowers), sparkle dust (similar to luster dust in effect), pearl dust (produces a shimmery luster), highlighting dust (come in either silver or gold and enhance your creations with a very high sheen, although some are not edible, so be careful), and disco dust (add a touch of color with lots of sparkle).  

Petal dust


Luster dust


Sparkle dust


Pearl dust

Disco dust


Cake decorating dusts are wonderful for all of the above purposes, and we certainly use them dry, but our favorite use is mixed with vodka and sprayed on with an air brush. 

Check out the vast supply of dusts on LusterDust.com and CandyLandCrafts.com, among other great on-line vendors or even in local craft stores that carry cake decorating supplies.  Once you use decorating dusts, cake decorating will never be the same for you!

A sample of a cake with luster dust (cake courtesy of Grosecar of Cake Central)


Happy baking!
Christina & Meghan

Monday, May 9, 2011

In the Spotlight: The Daring Kitchen!

Ever share a recipe with a friend, maybe even make the same recipe and compare notes over how it came out?  Isn't that fun and certainly a way to grow as a baker or cook?  If you have, then you need to join The Daring Kitchen.


One day, Lisa of La Mia Cucina and Ivonne of Cream Puffs in Venice decided to share a recipe for pretzels back in 2006, and before they knew what happened, by 2009, they had a website with thousands of followers!!  "Today, The Daring Bakers and The Daring Cooks span the world as bakers/cooks of all nationalities come together once a month to try something new in the kitchen!"

For more information about Lisa and Ivonne, check out the Daring Kitchen website and become a member.  The monthly challenges, whether you are a Daring Cook or a Daring Baker, are fun and certainly challenge (pardon the redundancy) you to spread your culinary wings!  We've been members since November 2010, and even though we can't do every single monthly challenge due to our already hectic schedules, we try to do it because it really is so much fun for us!

Check out our recent challenges from December, February, and March.  Stay tuned for May's challenge at the end of the month - it's a yummy one for chocolate lovers!

Until then, happy baking!
Christina & Meghan

Friday, May 6, 2011

Birthday cakes, a baby shower cake, and a bridal shower cake too!

May and June are always busy months for us, and this year is no different!  Last week we made a cake for Christina's cousin, this week we have a bridal shower and a boy's birthday, and next week we have a sweet 16. 

Phew! 

We end the month with a Safari-themed cake for twins turning one and then we head into June, when we have more birthday cakes and baby shower cookie favors too.

Never let it be said that we are idle!  We even have an order for wedding cake pop favors for July, so it looks like the summer is going to be busy as well.

Here is the baby shower cake from last week and the bridal shower cake from earlier this week, and be sure to come back tomorrow for the Yankee jersey cake for a boy's birthday, which is a reprise of a cake we did last year.

The bridal shower cake (below) was small and simple with the bride's main color of royal purple as an accent.  The couple's monogram on a heart with ribbon roses made this cake a sweet treat indeed!  The inside was a duplicate of the bride's actual wedding cake:  chocolate cake with Bavarian cream and strawberries (although we had to leave out the strawberries since one guest had severe allergies).  Nonetheless, the cake was yummy and the bride loved it!


The baby shower cake was a zebra print for a girl and also a reprise of a cake from last year.  The client requested matching cake pops; both cake and pops were red velvet, with cream cheese filling for the cake.  The cake was delivered to The Mansion in Madison.

A variation on a baby shower cake we did last year.

Coordinating cake pops!

A cake pop, up close and personal!


Happy baking!
Christina & Meghan

Thursday, May 5, 2011

Tasty Thursday: Double-Strawberry scones!

We found this recipe in our May issue of BHG magazine.  In keeping with our strawberries theme for Tasty Thursdays in May, here it is.  Christina is planning on making these for a Mother's Day brunch this weekend!

Double-Strawberry Scones
(recipe courtesy of BHG magazine and BHG.com)
Ingredients:
  • 2-1/2 cups all-purpose flour
  • 2 Tbsp. sugar
  • 1 Tbsp. baking powder
  • 1/4 tsp. salt
  • 1/2 cup (1 stick) butter, cut into chunks
  • 3/4 cup chopped fresh strawberries
  • 1/2 cup freeze-dried strawberries, (optional - Trader Joe's carries these!)
  • 2 Tbsp. snipped basil
  • 2 eggs, lightly beaten
  • 1/2 cup half-and-half
  • Half-and-half or milk
  • Sugar
Directions:
1. Preheat oven to 400 degrees F. In a large bowl stir together the flour, the 2 tablespoons sugar, baking powder, and salt. Using a pastry blender or two knives, cut in butter until mixture resembles coarse crumbs. Gently toss in fresh and freeze-dried strawberries and basil. Make a well in center of flour mixture; set aside.

2. In a medium bowl stir together eggs and the half-and-half. Add egg mixture to flour mixture all at once. Using a large spoon, gently stir just until moistened.

3. Turn dough out onto a generously floured surface. Knead dough by folding and gently pressing it 5 to 7 times, turning dough a quarter turn after each fold. Transfer to a lightly floured parchment-lined baking sheet. Pat or lightly roll dough into a 3/4-inch-thick circle. Cut circle into wedges and pull apart slightly.

4. Brush wedges with additional half-and-half and sprinkle with sugar. Bake about 16 minutes or until golden. Serve warm. Refrigerate any leftover scones; reheat 15 seconds in microwave. Makes 12 scones.

Happy baking!
Christina & Meghan

Wednesday, May 4, 2011

Wacky Cakes Wednesday!

Is this really a reason to celebrate???


Happy baking!
Christina & Meghan

Terrific tools: Wilton fondant tool set!

Wilton's 10-piece fondant/gum-paste tool set is a must-have for every cake decorator.

It includes every tool you would need to create beautiful gum paste and fondant flowers, leaves and accents.  The set comes in a covered case and "includes large/small veining tool, shell tool/knife, large/small dogbone tool, serrated quilting/cutting wheel, umbrella tool with 5 and 6 divisions, scriber/cone tool, large/small ball tool, palette knife and modeling sticks #1 and #2."

It sells for $29.99 on the Wilton website as well as in stores such as Michael's and AC Moore, although if you shop there, be sure to use a discount coupon for it!


Happy baking!
Christina & Meghan

Monday, May 2, 2011

In the spotlight: NY Cake!

First known as the Chocolate Gallery over 25 years ago, NY Cake is indeed a baker's paradise!


 A renowned cake decorator and gold medal award winner, Joan Mansour founded NY Cake after customers kept asking "repeatedly for a shop to purchase supplies to bake and decorate their cakes, she decided to emphasize more on baking products and we thereby became known as New York Cake and Baking Distributor."  Now her store is 5,000 square feet and carries everything a cake decorator could ever want!

Located at 56 West 22nd Street between 5th & 6th Avenues, NY Cake is open Monday through Saturday from 10 am to 6 pm for all of your baking needs.  They also offer classes of all kinds so be sure to check out their website and visit their store if you are in the area!

Happy baking!
Christina & Meghan

Sunday, May 1, 2011

Happy birthday, Jason!

Christina's cousin Jason is turning 26 on May 2nd, and yesterday she attended his birthday bash for which she provided the cake.  Red velvet with cream cheese was what the birthday boy requested, decorated with navy, chartreuse, hot pink, and white as well as some serious pizzazz!  The cake was a hit with all the party-goers.

Happy birthday, Jason!


Happy baking!
Christina & Meghan

Thursday, April 28, 2011

Tasty Thursday: Strawberry Cake!

Now that spring is here and the weather has turned for the better (we hope), fresh fruit is always first and foremost on our minds for healthy snacks as well as for cake.

Strawberries are always a personal favorite because they can be so juicy and delicious.  And fresh strawberry time is upon us, hooray!  In fact, we love strawberries so very much that we are going to showcase those luscious berries in each Tasty Thursday feature in May!

We've shared our go-to fresh strawberry filling in the past and today we'd like to share a delicious strawberry cake recipe we came across by chance. What we love about this cake is that it doesn't require any frosting, although a scoop of fresh whipped cream wouldn't be amiss on it!

Oh, and strawberries give Christina, our resident kitchen gadget geek, an excuse to use her favorite gadget:  a strawberry huller!  If you don't have one of these, be sure to get one.  They save your berries from being hacked to death and losing out on some of the precious fruit by simply digging out the green stem and none of the ripe, red berry.  Christina's is from The Pampered Chef and can be used to core tomatoes too, when they come into season!


Strawberry Cake 
Adapted from Martha Stewart
recipe courtesy of Two Peas and Their Pod


  • 6 tablespoons unsalted butter, at room temperature
  • 1 1/2 cups all-purpose flour
  • 1 1/2 teaspoons baking powder
  • 1/2 teaspoon salt
  • 1 cup granulated sugar
  • 1 large egg
  • 1/2 cup buttermilk
  • 1 teaspoon pure vanilla extract
  • 1 pound strawberries, hulled and sliced
  • 2 tablespoons turbinado sugar, for sprinkling on top of cake

1. Preheat oven to 350 degrees. Butter a 10-inch springform pan or pie plate. Sift flour, baking powder, and salt together into a medium bowl. Set aside.

2. Put butter and 1 cup sugar in the bowl of an electric mixer fitted with the paddle attachment. Mix until pale and fluffy, about 3 minutes. Add in egg, buttermilk, and vanilla extract. Mix until combined.

3. Gradually mix in flour mixture. Transfer batter to prepared pan. Arrange strawberry slices on top of batter. Sprinkle turbinado sugar over berries.

4. Bake cake 10 minutes. Reduce oven temperature to 325 degrees. Bake until cake is golden brown and firm to the touch, about 50-55 minutes. Let cool in pan. To serve, cut into wedges. Store cake at room temperature, for up to two days.

Serves 10

Happy baking!
Christina & Meghan

P.S.  One of our favorite children's books features the strawberry:


And here is a short video clip of the book too!

Wednesday, April 27, 2011

Tuesday, April 26, 2011

Terrific Tool Tuesday: Icing smoother!

Sometimes the simplest tool is the best tool to have and works wonders.  An icing smoother is one of those tools.

An icing smoother is a type of scraper, either plastic or metal (usually aluminum), that is used to smooth buttercream on the tops and sides of cakes in preparation for decorating.  Some smoothers even have different sides that can create cool designs on your icing - in that case, it is known as a decorating comb.

We use this smoother by Ateco:


There are lots of brands to choose from so depending on your needs, you can get one that does the job.  Online merchants such as Global Sugar Art carry them. 

Since we got one, our crumb coat for fondant has been the smoothest ever!

Happy baking!
Christina & Meghan

Monday, April 25, 2011

Happy Easter (a day late)!

We enjoyed our familial celebrations yesterday and never got to post pictures of our Easter desserts.  This year we decided to go with cake pops, a trend made all the rage by Bakerella.  These lovely little treats are the perfect end to a huge meal when you just want a taste of something sweet.

If you want to learn how to make them, we suggest you purchase Bakerella's book "Cake Pops".  It is easy, full illustrated of step-by-step directions, and many fun projects for the whole family.


Here are some pictures of Christina's family as they made them, as well as a look at Meghan's finished product!

Christina's girls hard at work!

Tim, Christina's husband, adding details to his cake pop!

Maddie, Christina's youngest daughter, painting corn syrup onto her pop!

The finished cake pops all wrapped up and ready to go to Easter dinner at Christina's parent's house!

Meghan's Easter cake pops!


Enjoy and happy baking!
Christina & Meghan

Saturday, April 23, 2011

Amazing Wedding Cakes - Sneak Peek of the *All-New* Episode this Sunday 4/24!

So we know we said we are on Spring break and wouldn't be posting (and trust us, we are enjoying the time off!) but we couldn't let the weekend go by without our weekly post about Amazing Wedding Cakes.  And you can probably bet we will have something fun for tomorrow's holiday too!

This Easter weekend may be filled jelly beans and egg-decorating, but don't forget to tune-into some beautiful cake-decorating as well with another all-new episode of Amazing Wedding Cakes! Check out the bridesmaids' dresses, winter wonderland and BBQ picnic cakes on Sunday, April 24th, at 10pm | 9c on WE tv!

Here's what's happening:

Robin in Minnesota creates a bridal shower cake that’s a stunning salute to being many times a bridesmaid, and now happily a bride. Christopher designs a wedding cake that’s a twist on a classic BBQ picnic, with checkered tablecloths, watermelon, dandelions and dragonflies.  White Flower in Ohio dreams up dangling snowflakes and rock sugar sparkle.

And make sure to tune in regularly for all new episodes of Amazing Wedding Cakes on Sundays at 10/9c on WE tv:


Happy baking!
Christina & Meghan

Monday, April 18, 2011

We're on Spring break!

As we are both teachers, this is our Spring break week and so we are also taking a break from our cakes.  Be sure to check back starting on April 25th for our regular daily blog entries!

Happy baking!
Christina & Meghan

Saturday, April 16, 2011

Amazing Wedding Cakes - Sneak Peek of the *All-New* Episode this Sunday 4/17! (VIDEO)

We don't know about you, but we are absolutely loving this season of Amazing Wedding Cakes!  The beach/baby wedding cake last week was a work of art and the friendly competition between the sisters' engagement cake was fun to watch too!

Love is certainly in the air this spring with another all-new episode of Amazing Wedding Cakes this weekend! Be sure to tune in for the cityscape, gift box and rock-climbing cakes on Sunday, April 17th, at 10pm | 9c on WE tv!


Here's what's happening:

Robin of Minneapolis’ Gateaux Inc. meets a couple who want to incorporate multiple cities into their wedding cake, to depict their “Tale of Three Cities” story. Lauren and Marianne of Cleveland’s White Flower Cake Shoppe get to work on a Gift Box cake for a couple having Holiday-themed nuptials, but black fondant fades very quickly in the light, so the team must work in half-darkness to finish the project, harnessing their best night vision! Last-but-not-least, Orange County’s Christopher Garren’s Cakes receives an order for a unique groom’s cake to play up the groom’s obsession with rock climbing.

Check out the sneak peek video clip below and tune in for all new episodes of Amazing Wedding Cakes on Sundays at 10/9c on WE tv.

Happy baking!
Christina & Meghan


Wednesday, April 13, 2011

In the news: Baby cakes!

I subscribe to several magazines and one of my favorites is always the Food Network one. This month's issue (May 2011, Volume 4 Number 4) had an article called "10 Things You Need To Know". And the very first thing listed was the following which was a fun piece of news to us:

"Bakers are delivering big news. Expectant moms and dads have started a sweet tradition: They're asking bakeries, instead of their doctors, to reveal whether the baby they are having is a boy or girl. The doctor writes down the gender and seals it in an envelope, then the baker makes either a blue or pink cake and decorates it with gender-neutral icing. The parents--to-be cut the first slice and discover the secret. Queen of Cakes bakery in Edina, MN, now gets order for "baby cakes" a few times a month. Says owner Terri Leckas, "I feel like the fairy godmother."

Here are some pics we found of the aforementioned baby cakes. And if you watched last week's "Amazing Cakes" on WE tv, then you would have seen one of these done!!


Happy baking!
Christina

Wacky Cakes Wednesday!

Warning:  the following wacky cake is not for the feint of heart - or stomach!!!  It is just plain disgusting and unnecessary!  Who made this and thought it was a good idea???

photo courtesy of RelaxedPolitics.com
Happy baking!
Christina & Meghan

Tuesday, April 12, 2011

Terrific Tool Tuesday: Silicone Molds!

Yesterday we featured First Impressions Molds LLC as our Spotlight vendor of the week, with the promise to tell you more about silicone molds today, so here we go.

Silicone molds are used with fondant and gum paste, as well as a myriad of other mediums, to create decorations for cakes.  Pastry chefs like Duff Goldman, Lauri Ditunno, and others use them to make life easier when they need a specific type of decoration that can be difficult to make.  

Purchasing silicone molds is the easiest way to go.  Site like First Impressions specialize only in molds, but you can also get them at site like Global Sugar Art, NY Cake, and others.  (See our list of favorite website in the right side bar of this site for more vendor suggestions.)  The molds come in a host of shapes and sizes, so if you search enough, you should find just what you need.

To use a silicone mold is super easy.  Here are how-to instructions courtesy of First Impressions:


How-to

"Take a piece of sugarpaste that you think will be enough to just fill the mold, knead it until it is smooth and roll it into a ball. Take a dusting puff* and dust the ball, then press it into the mold, making sure you capture all the detail and any undercuts*.

You can dust the top as you press the sugarpaste in if it begins to feel sticky. If you have excess paste after filling the mold you can either cut it off with a pair of scissors (careful not to clip the mold), pinch it off, or run a straight edge spatula across the top to remove the excess, then smooth it again.

If the mold is deep, highly detailed or has undercuts, you must place the filled mold into the refrigerator or freezer for 15-30 minutes depending on how deep the mold is to allow the sugarpaste to set firm and to make for easy de-molding.

De-molding:
After you have pressed your sugarpaste into the mold, you can simply pop the piece out by gently holding the mold with your thumbs on top and fingers on the bottom of the mold and flexing it out and up.

If you have placed the filled mold into the refrigerator or freezer simply remove it and de-mold, then place the finished piece on waxed paper to air dry.

* Dusting puff - fill the foot of one knee-high pair of pantyhose with a 1/4 cup of cornstarch, then tie it and cut off the excess, leaving about an inch extra at the top for holding onto.

* Undercuts - portions of the piece that are deeper into the bottom or side of the mold than the rest."


If you search for a mold and just can't find what you want, perhaps you need something unique and specific to a project, then the way to go is by making your own mold.  That is when a site like MYOM.com (Make Your Own Molds) comes in handy.  There you can find mold making kits, videos, and supplies and accessories to get the job done.  

Below are some molds that we own which make life easier, and even a couple we have on our wish list - that is, we wish we'd had them when we made a cake that featured just that decoration!!

Happy baking!
Christina & Meghan

We own this mold and use it with isomalt to make realistic-looking gems when needed.


Where, oh where, was this mold last summer when we were attempting make an engagement ring topper for a cake?!??
These drop beads make a beautifully elegant decoration!
Pearl borders have never been easier since we purchased this mold!!  No more messy piping bags and aching hands!


* Dusting puff - fill the foot of one knee-high pair of pantyhose with a 1/4 cup of cornstarch, then tie it and cut off the excess, leaving about an inch extra at the top for holding onto.

* Undercuts - portions of the piece that are deeper into the bottom or side of the mold than the rest."

Monday, April 11, 2011

Reflections of a cake decorator

Cake decorating shows are my secret passion.  In fact, I record so many that my husband often marvels at how many there actually are on television!

I thoroughly enjoy watching the process of creating a cake from start to finish; of watching another artist hard at work on something about which they are passionate.  There is never a time when I am viewing a show that I don't feel the inevitable pull to get up and make a cake of my own.  My family benefits from this compulsion regularly and they actually encourage me to watch my shows so that I will get inspired to bake for them!  

This evening I was sitting with some quiet time to myself (unheard of, I know!) while my husband was out with our eldest at softball practice and our two youngest were next door playing with friends.  I was finally getting around to watching Food Network Challenge's "Last Cake Standing" (last season) and thoroughly enjoying the first episode.  

Their first challenge was to create a cake that tells the story of who they are.  The competitors - Michelle Bommarito, Bronwen Weber, James Roselle, Courtney Clark, Mary Maher, and Elissa Strauss - got to work on what I saw as essentially the story of their life, and I paused to ask myself what I would have done if I was one of them. 

The answer was simple:  a tall, ambitious cake with exquisite detail that represented my love of all things cake, perhaps with me in the forefront and my children avidly watching while my husband lending a hand as I worked on my creation.  The cake would definitely be colorful, vibrant, and fun, much as I see myself.  

And if taste were a judging criterion, it would taste out of this world!

Happy baking!
Christina

In the Spotlight: First Impressions Molds, LLC!

This week we are linking together our "In the Spotlight" feature with our "Terrific Tool" of the week. When we sat down to brainstorm what vendor we wanted to feature and the tool we wanted to share with you, these two just went together perfectly!


This week's spotlighted vendor is First Impressions Molds LLC.


According to their website, "First Impressions Molds uses only the highest quality silicone to create molds used for a variety of mediums.  We offer an unparalleled selection of over 400 silicone molds at competitive prices and always with the best service."  Best of all, their molds can be used in so many ways, the creative possibilities are endless: fondant, gum paste, candle, royal icing, hard candy, candy clay, plaster and bread, just to name a few!

A silicone mold can make life so much easier when you are decorating a cake (see tomorrow's post to find out how) and First Impressions is the leader in the industry offering quality products with a wide selection at prices that won't break the bank!

Happy baking!
Christina & Meghan


Saturday, April 9, 2011

Amazing Wedding Cakes - Sneak Peek of the *All-New* Episode this Sunday 4/10! (VIDEO)

Last week's episode was fabulous, complete with a snow storm, a tricky topsy-turvy cake, and a koala cake too!  This week promises to be just as good.

Here's what's happening:

Two sisters, both engaged, convince Marianne and Lauren in Ohio to make competing cakes for their double engagement party. Which cake will outdo the other? A Minnesota couple celebrates the groom’s safe return from Afghanistan after a quickie marriage. With an added twist, the bride is pregnant, and only the couple knows the gender of the baby! Robin suggests they make the color of the actual cake under the fondant either blue or pink so that when the first slice is cut at the party, all their guests will learn whether the couple is having a boy or a girl!

Tune in for all new episodes of Amazing Wedding Cakes on Sundays at 10/9c on WE tv:

Here are some pics of the upcoming episode as well as a video clip too!  Enjoy and be sure to tune in on Sunday!


Ep3_Gateaux3Cities5.jpg


Ep3_WhtFlrwGiftBox1.jpg


Happy baking!
Christina & Meghan

Thursday, April 7, 2011

Tasty Thursday: Tres Leches Cake!

Christina's family is from Puerto Rico and as such, she was raised eating delicious comida criolla (AKA Puerto Rican food).  One of her favorite desserts is Tres Leches (Three Milks) cake; even though it is not necessarily of Puerto Rican origin, it is still a popular dessert option at island restaurants.

Recently, when she was in Puerto Rico for her grandmother's funeral, Christina had a delicious version at a local bakery in Orocovis. She came home with it on her mind and decided sharing her recipe for it would be a great idea for one of our Tasty Thursday slots!

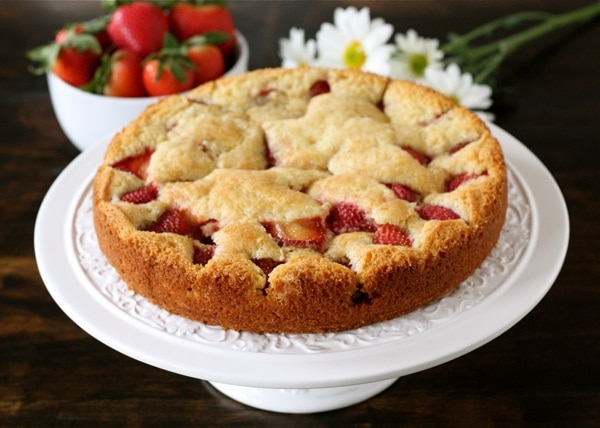
(Photo courtesy of Bobbyrica.com)


Tres Leches gets its name from the three different milks - sweetened condensed, evaporated, and whole - which gives it its richness and moistness.  It can be a sweet cake, traditionally made with a large quantity of sugar and a meringue topping but this version uses much less sugar and fresh whipped cream instead, cutting back on calories and preparation time.  Most recipes call for a light rum added to the milk syrup, which adds a nice adult flavor, although it can also be eliminated without sacrificing the taste.  And unlike other cakes, this cake tastes better the next day, after it has set completely.

Here is the recipe Christina makes whenever she craves is and annually for the multicultural festival at a local elementary school her children attend.  It comes from one of her favorite cookbooks called "Latin American Cooking Across the USA" by Himilce Novas and Rosemary Silva.  Enjoy!

Happy baking!
Christina & Meghan

Tres Leches Cake

For the cake:
  •  1 1/2 cups cake flour
  • 1 teaspoon baking powder
  • 1 cup granulated sugar
  • 1/2 cup (1 stick) unsalted butter, softened
  • 5 large eggs
  • 1/2 teaspoon pure vanilla extract
  • 1/3 cup milk


For the milk syrup:
  • 1 cup sweetened condensed milk
  • 1 cup evaporated milk
  • 1 cup whole milk
  • 1 tablespoon light rum or your favorite liqueur (optional)

For the whipped-cream topping:
  • 1 cup heavy cream
  • 1 teaspoon granulated sugar
  • 1/2 teaspoon pure vanilla extract

1.  Make the cake batter: sift together the cake flour and baking powder.  Cream the sugar and the butter in a large mixing bowl with an electric mixer until well blended.  Add the eggs and the vanilla extract, and beat until foamy.  With a rubber spatula, gently fold in the dry ingredients, alternating with the milk, until the batter is smooth.

2.  Pour the cake batter into a lightly greased 7 x 11 x 2-inch cake pan or baking dish, and bake on the middle rack in a preheated 350 degrees Farenheit oven for 30 minutes, or until a wooden toothpick inserted in the center comes out clean and the top springs back when gently pressed.  Allow the cake to cool in the pan on a wire rack for 20 minutes, then invert it onto a serving platter.  Pierce the cake with a fork in many places and allow it to cook completely.

3.  Next make the syrup: Whisk all the syrup ingredients in a medium mixing bowl until well blended.  Pour the syrup evenly over the cake and refrigerate the cake, covering in plastic wrap, for at least 3 hours.

Make the toppings: First chill the cream, a large mixing bowl, and beaters or a whisk in the refrigerator.  Beat the cream in the chilled mixing bowl with an electric mixer or the whisk until it begins to thicken.  Add the sugar and vanilla extract, and continue beating until stiff peaks form.  Cover the top and side of the cake with the whipped cream topping, using a spatula or knife.  Cut the cake and serve.  You may also cut the cake first, and then garnish with whipped cream only those portions you plan to serve.

Serves 10 to 12

Wednesday, April 6, 2011

Wacky Cakes Wednesday!

Okay, so can someone explain why you would bake a baby into a cake?  That is just strange!!!


Happy baking!
Christina & Meghan