Thursday, March 31, 2011

Tasty Thursday: Carrot Cake with Cream Cheese Frosting!

We actually shared this recipe around this time last year on our old blog but it is definitely worth repeating, especially with the popularity of carrot cake at Easter time.  The recipe is courtesy of Christina's mother, Nancy, who found it many years ago in a magazine. 

The cake itself is moist thanks to the addition of mayonnaise as well as pineapple chunks.  The spices give it a nice kick and the toasted walnuts add to its earthiness, but the clincher is the decadent cream cheese frosting that brings it all together.  Let us know what you think by sending us a comment! 


picture courtesy of The Best Carrot Cakes website

Best Carrot-Pineapple Cake
Cake Ingredients:
  • 2 cups sifted cake flour
  • 1 ¾ cups sugar
  • 1 tablespoon ground cinnamon
  • 1 teaspoon baking powder
  • 1 teaspoon baking soda
  • ½ teaspoon salt
  • ½ teaspoon allspice
  • 1 ¼ cups finely shredded carrot
  • 1 (8 ¼-ounce) can chunk pineapple (in heavy syrup)
  • ¾ cup mayonnaise
  • 4 eggs
  • 1 cup chopped walnuts, toasted
Baking Instructions:
  1. Pre-heat the oven to 350 degrees F.
  2. Grease and flour (or spray with Baker’s Joy) two 8 x 1 ½-inch or 9 x ½-inch round baking pans. Set the prepared baking pans aside.
  3. In a large mixing bowl, combine flour, sugar, cinnamon, baking powder, baking soda, salt, and allspice. Add carrot, undrained pineapple, mayonnaise, and eggs. Beat with an electric mixer on low speed till moistened.
  4. Beat on medium speed for another 2 minutes, scraping bowl occasionally. Stir in the walnuts by hand. The batter will seem loose but this is normal.
  5. Pour the batter into prepared pans. Bake in preheated oven for 30 to 35 minutes or until a toothpick inserted near centers comes out clean. Cool on wire racks for 10 minutes. Loosen sides. Remove cakes from pans. Cool cake layers thoroughly on wire racks.
  6. To assemble, place 1 cake layer on a serving plate. Spread layer with about ½ cup of cream cheese frosting. Top with second layer. Spread top and sides with remaining frosting. Store frosted cake, covered, in refrigerator.
Cream Cheese Frosting:

In a large mixing bowl, beat one 8-ounce package of cream cheese; ½ cup unsalted butter, softened; and 2 teaspoons of vanilla with electric mixer on medium speed until light and fluffy. Gradually beat in enough sifted powdered sugar (about 4 cups) to make frosting of spreading consistency. (Makes 3 ½ cups)

Happy baking!
Christina & Meghan

Wednesday, March 30, 2011

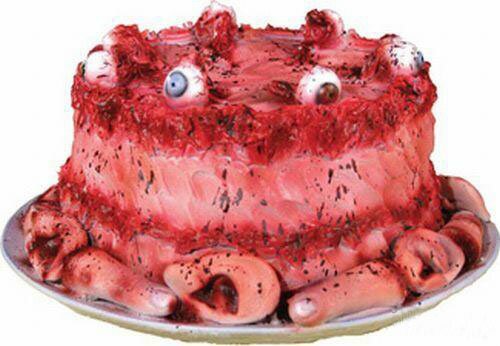
Wacky Cakes Wednesday!

We don't know about you, but this scary creation would put us off cake indefinitely.  It just goes too far into gross (although it is well done)!


Happy baking!
Christina & Meghan

Tuesday, March 29, 2011

Terrific Tool Tuesday: Fondx rolled fondant

Whenever you watch the cake shows on TV like "Ace of Cakes" (which is sadly off the air), "Cake Boss", and Food Network's "Challenge", to name a few, you see that the decorators are using pre-made fondant from a bucket, and more often than not it is the Satin Ice brand. 

Satin Ice is a fine product and we use it for accenting and smaller projects.  However, when it comes to covering a cake, we prefer not to use it for two reasons:  it doesn't taste as good as we'd like and it dries out easily so our cakes tend to crack with it. 

Instead, we discovered a different, better fondant that not only covers well but also tastes great:  Fondx by Cal-Java. 

We first discovered this product at the National Capital Area Cake Show in Virginia in 2010.  The vendor was present with samples, which we tasted.  That was our first clue that it was better than Satin Ice.  Then the vendor used it in a demo and we were sold; we purchased two 10-pound buckets on the spot for $25 each!

Ever since, we have been using Fondx to cover our cakes and we have been happier for it.  Once or twice we used Satin Ice in a pinch (mostly out of laziness to tint our own fondant - Satin Ice does offer a greater variety of colors) but each time we used it, we recalled immediately why we prefer Fondx and vowed never to do it again (until next time)!  Fondx just tastes better (like marshmallow) and looks better too!


Global Sugar Art, our favorite on-line vendor, sells a 2-pound bucket for $11.99 and a 10-pound bucket for $28.99 (although the more you purchase, the cheaper it is).  The down side is that it only comes in virgin white but you can tint it any color you desire by using food color, such as Wilton, or our preferred brand, AmeriColor

If you want it already tinted, then your best bet is to head over to CalJava Online to purchase it.  You'll pay more but you can also get it in black, ivory, blue, red, green, purple, orange, yellow, and brown.  CalJava even offers something called Fondx Zero; according to their site, "...this new 0g Trans Fat formula is perfect for cake artists looking for a healthier alternative or for business owners who desire to use 0g Trans Fat ingredients."

Where ever you get it or whichever variety you use, trust us, you're gonna love Fondx, so be sure to visit Global Sugar Art or Caljava Online or any vendor that carries it and get a bucket today!

Happy baking!
Christina & Meghan

Monday, March 28, 2011

In the Spotlight: Global Sugar Art

Last week's "In the Spotlight" honoree was Cakes We Bake. Check out the post here. This week we turn our attention to a fabulous vendor, Global Sugar Art.


Global Sugar Art is located at 625 Route 3, Unit 3, Plattsburgh, NY. They are open to the public from 9-5, Monday through Friday and "welcome you to visit our store and browse the thousands of cake decorating supplies in stock." However, since Plattsburgh is a very long road trip for us, we take advantage of the vast array of supplies via the Internet.

Simply put, Global Sugar Art rocks.

Seriously.

They have every cake decorating supply imaginable at great prices; they offer discounted shipping rates based on how much you spend; and they ship lightning fast.

No joke.

One Wednesday morning, we ordered a few last-minute items we needed for an upcoming cake via regular shipping (no expediting), and by Thursday afternoon - the very next day! - we had our stuff! And we live in Central NJ while Plattsburgh is in Upstate New York at the Canadian border!!! Needless to say, we were floored and super pleased too!

So head on over to Global Sugar Art, either in person or on line, and check out for yourself how great they really are!

Happy baking!
Christina & Meghan

Sunday, March 27, 2011

Two more cake show to add to the DVR schedule!

Ever since "Ace of Cakes" ended their 10-season run on Food Network, and Buddy Valastro's "Next Great American Baker" ended its first season, we have been in need of a fresh, new show to follow.  Naturally, we still tune into Food Network's "Challenge" as well as "Fabulous Cakes" on TLC for our fix, but even these are getting old.  As we wait for the next season of We's "Amazing Wedding Cakes" this Sunday, we've received word about two new shows coming our way soon!

Ashley Vicos of "Sweet Ashley's" in Atlanta is going to be hosting a new show called "Have Cake, Will Travel" premiering on the Food Network on April 2nd at 9pm.  The show will be a "new comedy docu-reality series that follows Ashley Vicos, the reigning queen of the cake decorating world, as she leads her motley crew of assistants around the country creating jaw-dropping, three-dimensional cakes for every type of event imaginable." 


Ashley Vicos

For those of us who loved Duff Goldman's series so much, this may be just what we need to keep the spirit alive.  We'll let you know once we see the premiere, but we are hopeful!


The second show is called "Last Cake Standing" and is also airing on Food Network, premiering on April 3rd at 10pm.  This show features "eight talented pastry chefs who face off in a cake competition unlike any other. With crazy twists and eliminations looming each week, only one will prevail and take home $100,000."  It almost sounds like "Challenge" to the extreme, doesn't it?  Can't wait to check it our.  Our DVR is about to get a major workout! 

Happy baking!
Christina & Meghan

Friday, March 25, 2011

The National Capital Area Cake Show is here!


This weekend - March 26-27, 2011 - is the annual National Capital Area Cake Show in Annandale, Virginia at Northern Virginia Community College.  Cake decorating enthusiasts can attend to see live challenges, free demonstrations, attend classes, view entries for a decorating competition open to all, and best of all, shop!  There will be top industry vendors such as CalJava, Choco-Pan, Guidlcraft, and dozens more.  There are even youth activities and a bake sale too, which this year benefits Icing Smiles and Fischer House.

One of our favorite parts, aside from shopping, is spotting the cake celebrities - in the past, we've seen Anne Heap, Mary Jo Dowling, Norm Davis, Zane Beg, Toba Garrett, and many more.  This year, the live challenge participants are Bob Brougham, Mike Elder, Dana Herbert (winner of TLC's "Cake Boss: The Next Great American Baker"), and Kathy Scott.

Be sure to head on down to Annandale for an unforgettable caking experience!

Happy baking!
Christina & Meghan

Thursday, March 24, 2011

Tasty Thursday: Honey Sand Ball cookies

Obviously, we are huge fans of cake, but there are many other desserts that put a smile on our faces.  As we rifled through our recipe boxes looking for a recipe to share this week, Christina found a personal favorite given to her by her dad, John.  She has used this recipe so often that it is tattered, worn, and covered in stains!

A picture of Christina's well-loved recipe in her dad's handwriting!


This recipe is quick and easy to whip up (any baker worth her weight in salt will have all of these ingredients on hand at any given time), and the cookies themselves are great with a nice cup of tea or a cold glass of milk.  Enjoy!

Here's what they should look like (photo courtesy of Whats Cooking America)


Honey Sand Balls

Ingredients:
  • 1 cup unsalted butter, softened
  • 1/2 cup sifted powdered sugar
  • 2 tablespoons honey
  • 2 cups all-purpose flour
  • 3/4 cup chopped walnuts
  • 1 teaspoon pure vanilla extract
  • 1/4 teaspoon salt
  • sifted powdered sugar

Directions:

  1. Preheat the oven to 325 degrees Fahrenheit.
  2. In a large mixing bowl, beat together butter, the 1/2 cup powdered sugar, and honey.  Add flour, nuts, vanilla, and salt.  Mix thoroughly, using hands if necessary. 
  3. Shape into 1-inch balls.  Place balls 1 1/2 inches apart on a cookie sheet.
  4. Bake at 325 degrees Fahrenheit for 14 to 16 minutes, or till the cookies are barely tinged with brown.
  5. While cookies are still warm, roll in or sprinkle them with powdered sugar twice.  Makes 48 cookies.
 Happy baking!
Christina & Meghan

Wednesday, March 23, 2011

Wacky Cakes Wednesday: Divorce Cake!

In our search for a wacky cake for this week's Wednesday feature, we came across something completely new to us:  divorce cakes!  We have never heard of the concept before but apparently there is growing market for just this kind of cake.

If you really think about it, why not?  You celebrate every other aspect of a marriage with a cake: engagement, bridal shower, rehearsal dinner, the wedding day, anniversaries, etc.  But what if your marriage becomes one of the nearly 50% that end in divorce?  And what if not only does it end, but it ends poorly, so much so that the signing of the papers calls for a celebration?  What better way to celebrate than with cake?

So here is our favorite divorce cake for our Wacky Cake Wednesday feature.  It tells the tale all too well.  Thanks to http://www.singlemommyhood.com/ for the image.


Happy baking!
Christina & Meghan

Tuesday, March 22, 2011

Terrific Tool Tuesday: Serrated Knife

A serrated knife?  Really?  That's an essential cake decorating tool?  We can sense your doubt, but trust us, this one is a must.  We honestly don't know how we lasted so long without one.  And we aren't talking about a small one either.  Oh no, we're talking about a big, lethal serrated knife (AKA a bread knife), like the ones you see the pros using on TV.

As a matter of fact, it was on Food Network's "Challenge" that we first noticed this tool being used.  As the professional cake artists raced against the clock to create, huge, extreme cakes they carved by hand, we notice that the knife was always the same:  long and serrated.  So we went out to find ourselves just such a tool.

After hitting several different stores (and picking up other unnecessary "necessary" items along the way) we settled on a knife we found at our local Home Goods store.  The brand was Fat Daddio's, a well-known name in the cake decorating industry, producing quality baking pans and other tools.


Our knife (we each got one) is a 14" cake/bread knife.  On websites like Cheftools.com, this knife goes for around $13.92.  We got ours for $7.99!  It was a deal too sweet to pass up, hence we got two.

There are tons of brands out there, some significantly more expensive by big name brands such as Henckels, Wusthof, and Shun, but we find this one works extremely well for leveling cakes as well as carving them for 3D projects such as our recent lighthouse cake.

Still doubt us?  Just ask Christina, who ended up getting three stitches in her right thumb when this lethal weapon slipped and "nicked" her finger.  We've actually both sustained injuries from using the knife, so a word to the wise:  be very careful, pay close attention, and if all else fails, wear safety gloves - your fingers will thank you!

Our Fat Daddio's serrated cake/bread knife.


Happy baking!
Christina & Meghan

Monday, March 21, 2011

Back to our regular schedule!

Hi all!

Just a quick note to let you know that we didn't vanish off the face of the Earth. Christina is our webmaster and site coordinator, and unfortunately, her maternal grandmother died suddenly last Tuesday (March 15, 2011) resulting in her having to fly to Puerto Rico for the week and so making it impossible for her to keep up with the blog.

Now that things have settled down for Christina and she is back stateside, she is ready to get back to what we do best: cakes, cakes, and more cakes!

Keep an eye out for our normal Tuesday post of Terrific Tools!

Happy baking!

Christina & Meghan

Monday, March 14, 2011

In the Spotlight: Cakes We Bake

Last week we featured Cake Central as our "In the Spotlight Monday" honoree.  Check out that post here.

This week we are choosing another favorite social network for cake decorators, Cakes We Bake, "where cake decorators and bakers share cake photos, cake decorating tips, and cake recipes."


We've been members of "Cakes We Bake" for a year and love all of the wonderful components of the site.  Once you join as a member (for free) you can personalize your page, upload photos, join discussion forums and so much more.  There links to cake events across the country and even around the world.  There are smaller subgroups based on your location and skill level; we are members of the New Jersey Cake Decorators and Self-Taught Decorators.  And our favorite, there are links to dozens upon dozens of instructional videos for different decorating techniques.

Here's a link to our page:  http://www.cakeswebake.com/profile/Christina790

Novice or expert, this is another great site for you to connect with other fellow cakesters from around the world so be sure to check it out!

Happy baking!
Christina & Meghan

Saturday, March 12, 2011

Cakes in the news: A Cake Fit for Royalty

My DVR is set for April 29th to record the royal wedding between Prince William and Kate Middleton.  I don't remember the wedding of his mother and father, Princess Diana and Prince Charles, but I do remember seeing photos, hearing talk about it, and following their life together as they had the boys, through their divorce, and as they built separate lives.

Prince William and Kate Middleton's official engagement photo.


As a little girl who dreamed of being a princess herself, the royal life was fascinating.  I remember being devastated when they announced their divorce and I recall vividly that I was babysitting a little girl named Madison on August 31, 1997 when Diana was killed in a tragic car accident.  Images of her young sons, left motherless, were so touching.  And of course, like any girl my age, I thought Prince William was dreamy.

Charles and Diana's engagement photo.


Now he is getting married and having his own fairy tale wedding to his long-time girlfriend who happens to be a regular girl (who says dreams can't come true?!??) and the wedding is just weeks away.  And of course, at this point in my life, married to my own dream guy and being a cake decorator too, I am interested in all of the usual things - flowers, dresses, etc. - but I am most especially interested in the cake.

Just yesterday it was revealed that chefs from the Welsh National Culinary Team have been hired to make the custom creation.  No theme has been shared, but rumors have it that harps, dragons and the national flag will be represented since Prince William and Kate will be settling in Wales, where he is stationed with the Royal Air Force.

Prince Charles and Princess Diana's official wedding cake (they were rumored to have had 27!) was supplied by Andrew Davidson of Classic Celebration Cakes as had been many royal wedding cakes before theirs, but William and Kate declined their services.  Charles and Di's cake had a traditional fruitcake center and the finished confection towered 6 feet high with five tiers.

Charles & Diana's cake

So since the details of the cake don't seem to be forthcoming, I will patiently wait until April 29th to see this cake fit for royalty.  Until then...

Happy baking!
Christina

Friday, March 11, 2011

My Little Pony cake!

Christina's daughter, Maddie, is finally having her 6th birthday party.  She wanted the "My Little Pony" theme, so the tableware, balloons, and other decorations fit the bill.  There will be pizza, a craft, and of course, a cake.  Last week we posted the recipe Christina would be using.

Here is a picture of the finished cake as well as a close-up of a slice of the fun rainbow inside.  Yum!


Happy baking!
Christina & Meghan

Thursday, March 10, 2011

Tasty Thursday is for recipe sharing!

The Internet is full of fabulous finds for delicious, unique or even classic cakes.  We've certainly tapped into many on-line resources for a recipe in a pinch, but we also have our own collection of recipes, some from our family members, some from our vast collection of cake cookbooks, and some we've found in magazines or even in newspapers, etc.  And not all of them are for cakes, but also cookies, pies, and other sweet treats too.

In the past we've shared the odd recipe here and there (go back through our posts from this blog and our old one for our recipes for Vanilla cake, Panna Cotta, Florentine cookies, Italian Cream cake, Snickerdoodle cookies, Christmas Stollen, Pumpkin Spice cupcakes, Apple pie, No-Fail Sugar cookies, Chocolate Better Than ___ cake, and so many more).  We'd like to continue in the same vein, but we're specifically reserving Thursdays for this tasty tradition. 

So here is our first Tasty Thursday recipe sharing.  It is from Christina's recipe box, given to her by her dear mom, Nancy, long, long ago - source unknown.  The recipe is for a to-die-for Apple cake that will have you smackin' your lips and cutting another slice in no time.  It is best served with vanilla ice cream or a cold glass of milk. 


Easy Apple Cake

Ingredients:

  • 1/2 cup butter
  • 2 eggs
  • 2 teaspoons vanilla extract
  • 1 1/2 cups flour
  • 1/2 cup sugar
  • 1 1/2 teaspoons baking powder
  • 1/2 teaspoon ground cinnamon
  • 1/2 cup milk
  • 1/4 cup Amaretto (or almond extract, in a pinch)
  • 3-4 cups apples, peeled,cored and diced (large dice)

Directions:

  1. Preheat oven to 350 degrees.
  2. Spray a Bundt pan with cooking spray; set aside.
  3. With an electric mixer, beat butter until light and fluffy.
  4. Add eggs and vanilla, continuing to beat until well mixed.
  5. In a separate bowl, combine flour, sugar, baking powder and cinnamon, mix well.
  6. Add half of the flour mixture to the butter/egg mixture, mix well.
  7. Add milk and Amaretto to the mixture, then the rest of the flour mixture, beating well after each addition.
  8. Fold in chopped apple, mixing gently but thoroughly.
  9. Pour mixture into prepared Bundt pan.
  10. Bake at 350 degrees for 45-50 minutes until toothpick stuck in the middle comes out clean.
  11. Remove from oven and let cool in pan for 10 minutes.
  12. Remove from pan and let cool on a rack.


Happy baking!
Christina & Meghan

Wednesday, March 9, 2011

Wacky Cakes Wednesday!

Cake decorating is an art form, no doubt about it.  The sky is the limit when you are creating a cake.  Generally, we at ATOCC prefer simple cakes with clean. modern lines, but if someone requests something specific, we create whatever they want.  And sometimes these requests can be a bit odd.  We've been fortunate in our cake requests, but some fellow cakesters out there have not been so fortunate, getting some downright bizarre requests.  

So we've decided to dedicate each Wednesday to a crazy cake that we found somewhere on-line, whether it be in Google images, on a blog, or somewhere else.  Cakes that make us gasp or cringe when we see them because they are so wacky. 

Let us know what you think of the crazy cakes by commenting on our posts each Wednesday.  We'd love to hear from you!  And if you have a wacky cake you want to share, send us an e-mail with an attachment or a link:  touchofclasscakes@gmail.com.

This week's cake caught our eye (pun intended) and is brought to you from http://www.cakepicturegallery.com/main.php


Happy baking!

Christina & Meghan

Tuesday, March 8, 2011

Terrific Tool Tuesday: Ribbon cutters!

Tuesdays at "A Touch of Class Cakes" have been renamed "Terrific Tool Tuesdays".  So what does that menan?  It's simple:  each Tuesday we will feature a different cake decorating tool that cake decorators just have to have and we can't live without.

Today's tool is a ribbon cutter.  This easy-to-use tool allows you to quickly cut stripes, ribbons, and even bows for your cakes.  There are several different varieties available but we are going to highlight only two:


1)  Wilton Ribbon Cutter and Embosser Set:  According to the Wilton site, "This easy-to-use tool is the perfect way to add beautiful textured fondant ribbons, stripes and bows to your cake. Just choose the cutting and embossing wheel designs you want, slide the washer, core, wheels and spacers on the roller handle, and roll on top of your fondant. We suggest brushing the assembled roller with shortening for easy release. The perfectly cut ribbon strips are ready to place right on your cake! Produces ribbon widths from 1/4 in. to 3 3/4 in. when combining spacers."

http://www.wilton.com/store/images/site_images/1907-1203_m.jpg


The tool runs about $16.49 and comes with 26 different pieces.  We use ours regularly since we generally only make a ribbon border for most of our cakes or perhaps a simple bow.  Some glitches that you should be aware of are that if you tighten the screw too much, the tool won't roll; likewise, if you don't tighten it enough, the pieces can easily come apart.  It can be tricky to get used to (Meghan still giggles when I drop pieces all over the place as Christina adjust the widths!) but well worth it in the end for making even strips for bows and ribbons.

However, if you are looking to add multiple stripes to your cake or are making a cake of many layers, then this next took is more what you will need:


2)  Ateco 7 Wheel Cutter Pastry Cutter:  Much pricier than the Wilton tool (on CooksDream.com, it runs $82.59 plus shipping) this tool is a time saver when you need even cuts and uniform portions in large quantities.  It can be used for ribbons and bows for cakes as well as  for "cutting brownies, cookies, cake and pastry or pasta dough."  Duff Goldman and other master cake decorators use this tool frequently.  You can also opt for the 6 or 12 wheel versions, depending on your needs.  We haven't purchased this yet as we seem to be making out just fine with our Wilton tool, but it is definitely on our wish list.


http://cooksdream.com/Merchant2/images/13957.jpg


Check out some of our favorite cake decorating supply websites under our "Our Favorite Sites" and be sure to go out and get yourself one of these tools.  You won't regret it, especially if you've ever struggled to cut ribbons before!

Happy baking!
Christina & Meghan

Monday, March 7, 2011

In the Spotlight: Cake Central

So we've decided to make Mondays a day to spotlight great cake-related websites.  These are websites we frequently visit to learn new things, read some fun stuff, or purchase supplies.

Our first "In the Spotlight" website is Cake Central.

http://nattycakes.net/Images/Main%20Page/Cake%20Central%20Logo.jpg

This website is dear to our hearts as it was the first one we became members of as we began our travel down the road of cake decorating.  Cake Central is called "the world's largest social network for cake decorators" and as such is a wealth of resources and information for everything cake-related.  Need an idea for a cake design?  Go to Cake Central's "Galleries".

Need a tried-and-true recipe for a cake?  Go to Cake Central's "Recipes" page.  Need advice on how to do something for a cake?  Go to Cake Central's "Forums" and create a discussion on the topic in question.  You'll be pleasantly surprised at how many people are willing to help you in a tough spot.  We cakesters are a kind and generous bunch.  :)

There are also links to classes, shopping, contests, articles, news, and so much more.  And best of all, in March of 2010, Cake Central launched their very own magazine.  It has only been a year and there have been some kinks along the way, but the magazine is a great source for tutorials, recipes, product reviews, and industry news.  A subscription runs $60 for a year of 12 issues with free shipping within the United States.  The magazine is also available at select cake decorating shops throughout the country so click here to see if you can get it in your state.  We have a subscription but we can also get a copy at our local cake decorating shop, Sweet N Fancy.

The most recent issue of Cake Central Magazine.


So whether you are a novice or master cake decorator, if you are not a member of Cake Central (which, BTW, is free) then you need to head over there now and become one!

Happy baking!
Christina & Meghan

Sunday, March 6, 2011

Secret project revealed: Lighthouse bridal shower cake!

Christina's friends, Jen and Mike, are getting married on April 16, 2011 and yesterday was Jen's bridal shower at Rosie's Wine Bar in Garwood, NJ. 

Kelley, another friend and also the MOH, asked Christina to make Jen's shower cake (we made Kelley's sister's shower cake last year and she just loved it) in the theme of the shower, which was nautical.  The theme was inspired by their engagement:  Mike asked Jen to marry him at Old Barney, the lighthouse at Long Beach Island, NJ. 

The historic Barnegat Lighthouse on Long Beach Island, N.J.  LBI's gift to mariners.
Old Barney, Long Beach Island, NJ (picture courtesy of www.longbeachisland.com/history.html) 


 This cake was a labor of love for Christina, as Jen and Mike are two very special people to her.  The design seemed simple: a conical shape decorated to look like a lighthouse.  A quick sketch was step one:

The original design, which underwent many changes.

The support structure came next.  That was a challenge in and of itself because we had never created one despite watching it done many times on TV.  Christina consulted her dad and a very hand colleague, Jim, and with their advice and a shopping list in hand, hit Home Depot for what she would need.  (See our post from March 1st on our old blog for step-by-step details and a picture.)

Another challenge for this cake was figuring out the beacon for the top of the lighthouse.  Isomalt (a sugar substitute that is used for sugar sculpture since it does not crystallize as quickly as regular sugar) was considered but quickly abandoned as too tricky to try to pull off after the adventure making the support structure.  Another shopping trip, this time to Pier 1 Imports, wielded perfect results:  a metal candle holder that showcased four small lanterns that perfectly resembled a lighthouse beacon! 

Pier 1 Imports tea light lanterns are the perfect lighthouse beacons!


The final step was the actual cake itself.  Kelley requested chocolate since it is the favorite of the bride and groom.  The filling was our popular homemade strawberry (made of the freshest berries, sugar, and cornstarch cooked down), which had been the same flavor cake we made for Kelley's sister's cake last year. 

The new challenges came once the cake layers were stacked on the support structure and when the filling began leaking past the frosting dams Christina made to keep said filling inside the cake where it belonged.  An extra thick crumb coat and overnight refrigeration took care of that.  Next came covering it in fondant, a new nightmare.  Fondant is notoriously heavy and this cake was tall.  Another friend and fellow cake maker, Laura, was called in for an extra set of hands.  After rolling it out twice, the fondant was finally on! 

Old Barney is a maroon color on top so Christina decided to use her airbrush machine for this job, a gift from her husband at Christmas, which had only been used up to this point for spraying vodka on cakes to finish them off.  (The vodka wets the cake, eliminating unsightly powdered sugar spots from rolling the fondant but then evaporates leaving a nice sheen on the cakes.)  The airbrush was a bad idea.  This led to Christina taking off the fondant and starting from scratch!  In the end, the second fondant job was much better, done in two pieces, white for the bottom half and red for the top. 

After that, the finishing touches were a piece of cake, pun intended!  The coup de grace was the beacon on top with a battery operated tea light candle lighting the way to Jen and Mike's future wedded bliss.


After all was said and done, the cake was hit, Jen and Mike both loved it, and even had some left to take home for later!

Happy baking!
Christina & Meghan

Friday, March 4, 2011

Happy birthday, Maddie!

Christina's middle child, Madeline, is 6 today so we wanted to wish her a happy, happy birthday! 

She is bringing these cupcakes in to school today to share with her classmates.  On Sunday she'll have a small cake for her family, design to be determined (we'll post that over the weekend), and next Friday she'll get her special My Little Pony rainbow cake (see yesterday's post).


Confetti cupcakes with vanilla frosting and confetti sprinkles in a carry case (available at www.SweetNFancy.com)


Happy baking!
Christina & Meghan

Thursday, March 3, 2011

Rainbow cake!

Tomorrow Christina's daughter, Maddie, turns six and she has requested a My Little Pony cake for her party next week.  While planning the cake, which we will post here upon its completion, Christina decided to do add a fun element to the baked layers themselves: a rainbow affect!

That means she will be making multiple single layers of vanilla cake which she will then dye different colors using food coloring.  When stacked together, they will create a rainbow, which looks pretty darned impressive when you cut into the cake!

Here is an example of what we mean: 

(Picture courtesy of http://www.marthastewart.com/)

Stay tuned for Christina's cake next week!


Until then, here is a copy of our vanilla cake recipe (which is actually a 1-2-3-4 cake, recipe courtesy of Swan's Down) in case you decide to try out a rainbow cake for yourself.  We use this particular recipe because it is delicious and holds up well to stacking and carving.

 1-2-3-4 Cake (AKA vanilla cake)

Ingredients:
  • 1 cup butter or margarine
  • 2 cups sugar
  • 3 cups sifted Swans Down Cake Flour
  • 3 teaspoons baking powder
  • 1/2 teaspoon salt
  • 4 eggs
  • 1 cup milk
  • 1 teaspoon vanilla
  • 1/2 teaspoon almond extract
Baking Instructions:

  1. In the bowl of a stand mixer, cream butter. Gradually add sugar, beating until light and fluffy.
  2. Sift flour with baking powder and salt. Add eggs one at a time to creamed mixture, beating well after each addition.
  3. Add flour mixture alternately with milk and flavorings, beating after each addition until smooth.
  4. Baking: Pour batter into 3 greased and floured 9-inch layer pans, using about 2-1/3 cups batter in each pan.
  5. Bake at 350 degrees F for 25 to 30 minutes. Cool in pans 10 minutes. Remove from pans and finish cooling on racks.
For the rainbow effect, divide the batter evenly between six medium bowls. Add enough of each color of food coloring to each bowl, whisking, until desired color is reached.  Transfer each color to its individual cake pan and bake from there.  (Note:  Christina is planning on doubling this recipe and baking her layers in 6" round pans.)  Be sure to stack your layers in the order of ROY G BIV so you get the true rainbow look! 


Happy baking!
Christina and Meghan

Wednesday, March 2, 2011

Upcoming event: Cupcakes with Buddy

Hi all!

One of New Jersey's very own cakesters, Buddy Valastro, is participating in a worthwhile event to benefit epilepsy awareness and education in just a couple of short weeks.  This fundraiser is near and dear to our hearts, and so we are planning to attend.  Here's the write-up from the official website for the event, "Cupcakes with Buddy":


"On Sunday, March 13, 2011, join Buddy Valastro of Carlo's Bakery in Hoboken and his family for a fun afternoon of purple cupcakes provided by local bakeries. Watch Buddy's demonstration and taste his special cake for the occasion!

Hosted by The Anita Kaufmann Foundation in honor of Purple Day for epilepsy awareness, all guests are asked to wear purple to show their support.

Cupcakes With Buddy also features a silent auction with incredible prizes and a huge selection of delicious cupcakes. This event is sure to be one of New Jersey's most talked about. Purchase your tickets today and support epilepsy awareness and education.

Advance Individual Ticket - $50.00
At the Door - $75.00 (cash only)

For an additional $30, you can also pre-order an autographed copy of Buddy’s new book. All proceeds support epilepsy awareness and educational programming.

To learn more about The Anita Kaufmann Foundation, please visit www.akfus.org. For more information on Purple Day, stop by www.purpleday.org"
 The event is for a worthwhile cause, so if you can, purchase your tickets today!

Christina & Meghan

Coming soon!

Hi all!

We are in the process of finishing the design of this new & improved blog so we can move over from touchofclasscakes.wordpress.com.  Check out the current blog until we get this one up and running!

Happy baking!
Christina & Meghan