Tuesday, April 5, 2011

Terrific Tool Tuesday: Spatulas!

When most people hear the word spatula, they envision the tool they use to flip pancakes or eggs.  But a cake decorator sees something different, and not just one type either.

Spatulas come in all different shapes, sizes, and styles.  You can get a short, medium, or long one; one with a plastic handle or a wooden one; offset or straight; or even one with a tapered end.  We believe that it is best to have several because you never know which one will work best for the task at hand.  Wilton and Ateco are two trusted brands that made quality spatulas with stainless steel blades.

The spatula serves many purposes, from frosting cakes to spreading or mixing toppings.  The blade should be slightly flexible, which aids in spreading and making soft toppings smooth in appearance. The spatula is used as a decorating tool but can also be used to serve slices of cake, pieces of pie or bars. We even slide ours under a cake to lift it slightly so we can slip our hands beneath to move it!

Baking spatulas are available with various length blades ranging from 4 to 14 inches. Here are samples of just four different types that are out there.  If you are in the market for one, we suggest getting yours from a site like Cook's Dream or Wilton or even at your local craft store like Michael's or AC Moore.


Plastic handle, 4 1/2" x 3/4"


Wooden handle, 4 1/2" x 3/4"


Wooden handle, tapered tip, 5" x 3/4"


Happy baking!
Christina & Meghan

Monday, April 4, 2011

March's Daring Bakers Challenge: Yeasted Meringue Coffee Cake

The March 2011 Daring Baker’s Challenge was hosted by Ria of Ria’s Collection and Jamie of Life’s a Feast. Ria and Jamie challenged The Daring Bakers to bake a yeasted Meringue Coffee Cake.  I am a little late in posting but I have a good excuse: I had to travel out of the country for a funeral!  I hope the folks at the Daring Kitchen can forgive me!  :)

Anyway, the challenge was similar to the stollen back in December in that it was a wreath with similar steps.  However, this cake was definitely a sweet treat!  I made two, kept one home and had that with coffee and tea, and brought the other one to school to share with colleagues because word was that it was best on the first day or two.

Here is the recipe I followed, as well as some pics of the process and the final product.  It is a little time consuming but definitely yummy!


FILLED MERINGUE COFFEE CAKE
 
My favorite part:  mes en place!

The dough ready to be covered and allowed to rise!

My finished cake!

A close up of the inner yumminess!


Makes 2 round coffee cakes, each approximately 10 inches in diameter.
The recipe can easily be halved to make one round coffee cake.

Ingredients
For the yeast coffee cake dough:
4 cups (600 g / 1.5 lbs.) flour
¼ cup (55 g / 2 oz.) sugar
¾ teaspoon (5 g / ¼ oz.) salt
1 package (2 ¼ teaspoons / 7 g / less than an ounce) active dried yeast
¾ cup (180 ml / 6 fl. oz.) whole milk
¼ cup (60 ml / 2 fl. oz. water (doesn’t matter what temperature)
½ cup (135 g / 4.75 oz.) unsalted butter at room temperature
2 large eggs at room temperature

For the meringue:
3 large egg whites at room temperature
¼ teaspoon salt
½ teaspoon vanilla
½ cup (110 g / 4 oz.) sugar

For the filling:
1 cup (110 g / 4 oz.) chopped pecans or walnuts
2 Tablespoons (30 g / 1 oz.) granulated sugar
¼ teaspoon ground cinnamon
1 cup (170 g / 6 oz.) semisweet chocolate chips or coarsely chopped chocolate


Egg wash: 1 beaten egg
Cocoa powder (optional) and confectioner’s sugar (powdered/icing sugar) for dusting cakes

Directions:


Prepare the dough:
In a large mixing bowl, combine 1 ½ cups (230 g) of the flour, the sugar, salt and yeast.
In a saucepan, combine the milk, water and butter and heat over medium heat until warm and the butter is just melted.
With an electric mixer on low speed, gradually add the warm liquid to the flour/yeast mixture, beating until well blended. Increase mixer speed to medium and beat 2 minutes. Add the eggs and 1 cup (150 g) flour and beat for 2 more minutes.
Using a wooden spoon, stir in enough of the remaining flour to make a dough that holds together. Turn out onto a floured surface (use any of the 1 ½ cups of flour remaining) and knead the dough for 8 to 10 minutes until the dough is soft, smooth, sexy and elastic, keeping the work surface floured and adding extra flour as needed.
Place the dough in a lightly greased (I use vegetable oil) bowl, turning to coat all sides. Cover the bowl with plastic wrap and a kitchen towel and let rise until double in bulk, 45 – 60 minutes. The rising time will depend on the type of yeast you use.

Prepare your filling:In a small bowl, combine the cinnamon and sugar for the filling if using. You can add the chopped nuts to this if you like, but I find it easier to sprinkle on both the nuts and the chocolate separately.
Once the dough has doubled, make the meringue:
In a clean mixing bowl – ideally a plastic or metal bowl so the egg whites adhere to the side (they slip on glass) and you don’t end up with liquid remaining in the bottom – beat the egg whites with the salt, first on low speed for 30 seconds, then increase to high and continue beating until foamy and opaque. Add the vanilla then start adding the ½ cup sugar, a tablespoon at a time as you beat, until very stiff, glossy peaks form.

Assemble the Coffee Cakes:
Line 2 baking/cookie sheets with parchment paper.
Punch down the dough and divide in half. On a lightly floured surface, working one piece of the dough at a time (keep the other half of the dough wrapped in plastic), roll out the dough into a 20 x 10-inch (about 51 x 25 ½ cm) rectangle. Spread half of the meringue evenly over the rectangle up to about 1/2-inch (3/4 cm) from the edges. Sprinkle half of your filling of choice evenly over the meringue (ex: half of the cinnamon-sugar followed by half the chopped nuts and half of the chocolate chips/chopped chocolate).
Now, roll up the dough jellyroll style, from the long side. Pinch the seam closed to seal. Very carefully transfer the filled log to one of the lined cookie sheets, seam side down. Bring the ends of the log around and seal the ends together, forming a ring, tucking one end into the other and pinching to seal.
Using kitchen scissors or a sharp knife (although scissors are easier), make cuts along the outside edge at 1-inch (2 ½ cm) intervals. Make them as shallow or as deep as desired but don’t be afraid to cut deep into the ring.
Repeat with the remaining dough, meringue and fillings.
Cover the 2 coffee cakes with plastic wrap and allow them to rise again for 45 to 60 minutes.
Preheat the oven to 350°F (180°C).
Brush the tops of the coffee cakes with the egg wash. Bake in the preheated oven for 25 to 30 minutes until risen and golden brown. The dough should sound hollow when tapped.
Remove from the oven and slide the parchment paper off the cookie sheets onto the table. Very gently loosen the coffee cakes from the paper with a large spatula and carefully slide the cakes off onto cooling racks. Allow to cool.
Just before serving, dust the tops of the coffee cakes with confectioner’s sugar as well as cocoa powder if using chocolate in the filling. These are best eaten fresh, the same day or the next day.

Happy baking!
Christina

In the Spotlight: The Cookie Cutter Shop!

In addition to cakes, we also make cookie favors, a pretty big trend for all types of parties.  We've made birthday favors, holiday cookies, and bridal shower favors too.  Our cookies are delicious sugar cookies decorated with fondant and royal icing in whatever design is desired - the sky is the limit!  Here are some of our past projects.

add pics here!

When we decided to start making cookies, we began a hunt to add to our limited cookie cutter supplies and that is when we came across The Cookie Cutter Shop. 


We won't tell you that you can get every type of cookie cutter on their website, but you can definitely get a great selection of top-notch quality at super prices and their customer service is top notch!  They've been in service since 1999 and are truly a great, family-run company.  They ship quickly and always include recipes and a small gift in the box.  The first time we ordered, we received this adorable miniature reusable shopping bag!


Their cutters come in all shapes and sizes, and if you can't find what you're looking for, you can always purchase a Make-Your-Own-Cutter kit.  The site offers not only cutters but also baking supplies, cookie cookbooks, accessories (bags, ties, etc), and recipes as well. 

So as they suggest on their home page, "pour yourself a cup of your favorite tea and browse through (their) selection!"

Happy baking!
Christina & Meghan

Saturday, April 2, 2011

Amazing Wedding Cakes - Cool koala cake on the *all-new* episode this Sunday, 4/3!

Spring weddings are here, for us personally kicking off when Christina's friends Jen and Mike get married in two short weeks (April 16, 2011)! 

The industry is in full swing making nuptial dreams come true for countless couples, and for us the most important aspect, of course, is the cake!  Naturally, some of our local favorites are in on the action; for instance, Pink Cake Box is participating in Braunschweiger's bridal show today, April 2nd, in Morristown, NJ from 11am to 4pm.  (Sorry for the late notice!)

Even if you are not involved in a wedding or attending one soon, there are plenty of opportunities to see how the cake is made especially for the bride and groom. How?  By tuning in to a cake show, of course!  The best for the topic at hand is Amazing Wedding Cakes.  Check out an all new episode of this Sunday, April 3rd, at 9pm | 8c on WE tv! 

Here's what's happening this Sunday:

"A topsy-turvy, black & white wedding cake takes a detour in New Jersey. In Minnesota, a stunning gold cake with purple orchids nearly gets lost in the blizzard of the century. And in Orange County, two cute Koalas set the stage for "I Do."

Tune in for all new episodes of Amazing Wedding Cakes on Sundays at 10/9c on WE tv:

Ep2ChrisGarrenKoala5.jpg


Ep2_CakeArtistTopsyTurvy1.jpg

Let us know what you think of the new season!

Happy baking!
Christina & Meghan

Thursday, March 31, 2011

Tasty Thursday: Carrot Cake with Cream Cheese Frosting!

We actually shared this recipe around this time last year on our old blog but it is definitely worth repeating, especially with the popularity of carrot cake at Easter time.  The recipe is courtesy of Christina's mother, Nancy, who found it many years ago in a magazine. 

The cake itself is moist thanks to the addition of mayonnaise as well as pineapple chunks.  The spices give it a nice kick and the toasted walnuts add to its earthiness, but the clincher is the decadent cream cheese frosting that brings it all together.  Let us know what you think by sending us a comment! 


picture courtesy of The Best Carrot Cakes website

Best Carrot-Pineapple Cake
Cake Ingredients:
  • 2 cups sifted cake flour
  • 1 ¾ cups sugar
  • 1 tablespoon ground cinnamon
  • 1 teaspoon baking powder
  • 1 teaspoon baking soda
  • ½ teaspoon salt
  • ½ teaspoon allspice
  • 1 ¼ cups finely shredded carrot
  • 1 (8 ¼-ounce) can chunk pineapple (in heavy syrup)
  • ¾ cup mayonnaise
  • 4 eggs
  • 1 cup chopped walnuts, toasted
Baking Instructions:
  1. Pre-heat the oven to 350 degrees F.
  2. Grease and flour (or spray with Baker’s Joy) two 8 x 1 ½-inch or 9 x ½-inch round baking pans. Set the prepared baking pans aside.
  3. In a large mixing bowl, combine flour, sugar, cinnamon, baking powder, baking soda, salt, and allspice. Add carrot, undrained pineapple, mayonnaise, and eggs. Beat with an electric mixer on low speed till moistened.
  4. Beat on medium speed for another 2 minutes, scraping bowl occasionally. Stir in the walnuts by hand. The batter will seem loose but this is normal.
  5. Pour the batter into prepared pans. Bake in preheated oven for 30 to 35 minutes or until a toothpick inserted near centers comes out clean. Cool on wire racks for 10 minutes. Loosen sides. Remove cakes from pans. Cool cake layers thoroughly on wire racks.
  6. To assemble, place 1 cake layer on a serving plate. Spread layer with about ½ cup of cream cheese frosting. Top with second layer. Spread top and sides with remaining frosting. Store frosted cake, covered, in refrigerator.
Cream Cheese Frosting:

In a large mixing bowl, beat one 8-ounce package of cream cheese; ½ cup unsalted butter, softened; and 2 teaspoons of vanilla with electric mixer on medium speed until light and fluffy. Gradually beat in enough sifted powdered sugar (about 4 cups) to make frosting of spreading consistency. (Makes 3 ½ cups)

Happy baking!
Christina & Meghan

Wednesday, March 30, 2011

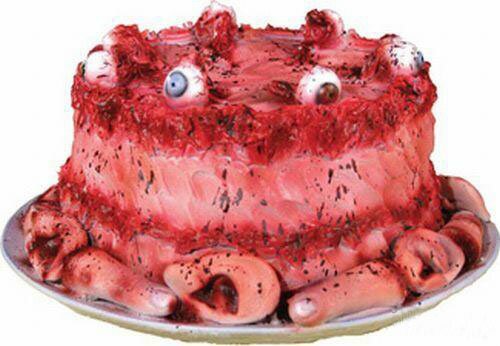
Wacky Cakes Wednesday!

We don't know about you, but this scary creation would put us off cake indefinitely.  It just goes too far into gross (although it is well done)!


Happy baking!
Christina & Meghan

Tuesday, March 29, 2011

Terrific Tool Tuesday: Fondx rolled fondant

Whenever you watch the cake shows on TV like "Ace of Cakes" (which is sadly off the air), "Cake Boss", and Food Network's "Challenge", to name a few, you see that the decorators are using pre-made fondant from a bucket, and more often than not it is the Satin Ice brand. 

Satin Ice is a fine product and we use it for accenting and smaller projects.  However, when it comes to covering a cake, we prefer not to use it for two reasons:  it doesn't taste as good as we'd like and it dries out easily so our cakes tend to crack with it. 

Instead, we discovered a different, better fondant that not only covers well but also tastes great:  Fondx by Cal-Java. 

We first discovered this product at the National Capital Area Cake Show in Virginia in 2010.  The vendor was present with samples, which we tasted.  That was our first clue that it was better than Satin Ice.  Then the vendor used it in a demo and we were sold; we purchased two 10-pound buckets on the spot for $25 each!

Ever since, we have been using Fondx to cover our cakes and we have been happier for it.  Once or twice we used Satin Ice in a pinch (mostly out of laziness to tint our own fondant - Satin Ice does offer a greater variety of colors) but each time we used it, we recalled immediately why we prefer Fondx and vowed never to do it again (until next time)!  Fondx just tastes better (like marshmallow) and looks better too!


Global Sugar Art, our favorite on-line vendor, sells a 2-pound bucket for $11.99 and a 10-pound bucket for $28.99 (although the more you purchase, the cheaper it is).  The down side is that it only comes in virgin white but you can tint it any color you desire by using food color, such as Wilton, or our preferred brand, AmeriColor. 

If you want it already tinted, then your best bet is to head over to CalJava Online to purchase it.  You'll pay more but you can also get it in black, ivory, blue, red, green, purple, orange, yellow, and brown.  CalJava even offers something called Fondx Zero; according to their site, "...this new 0g Trans Fat formula is perfect for cake artists looking for a healthier alternative or for business owners who desire to use 0g Trans Fat ingredients."

Where ever you get it or whichever variety you use, trust us, you're gonna love Fondx, so be sure to visit Global Sugar Art or Caljava Online or any vendor that carries it and get a bucket today!

Happy baking!
Christina & Meghan

Monday, March 28, 2011

In the Spotlight: Global Sugar Art

Last week's "In the Spotlight" honoree was Cakes We Bake. Check out the post here. This week we turn our attention to a fabulous vendor, Global Sugar Art.


Global Sugar Art is located at 625 Route 3, Unit 3, Plattsburgh, NY. They are open to the public from 9-5, Monday through Friday and "welcome you to visit our store and browse the thousands of cake decorating supplies in stock." However, since Plattsburgh is a very long road trip for us, we take advantage of the vast array of supplies via the Internet.

Simply put, Global Sugar Art rocks.

Seriously.

They have every cake decorating supply imaginable at great prices; they offer discounted shipping rates based on how much you spend; and they ship lightning fast.

No joke.

One Wednesday morning, we ordered a few last-minute items we needed for an upcoming cake via regular shipping (no expediting), and by Thursday afternoon - the very next day! - we had our stuff! And we live in Central NJ while Plattsburgh is in Upstate New York at the Canadian border!!! Needless to say, we were floored and super pleased too!

So head on over to Global Sugar Art, either in person or on line, and check out for yourself how great they really are!

Happy baking!
Christina & Meghan