I subscribe to several magazines and one of my favorites is always the Food Network one. This month's issue (May 2011, Volume 4 Number 4) had an article called "10 Things You Need To Know". And the very first thing listed was the following which was a fun piece of news to us:
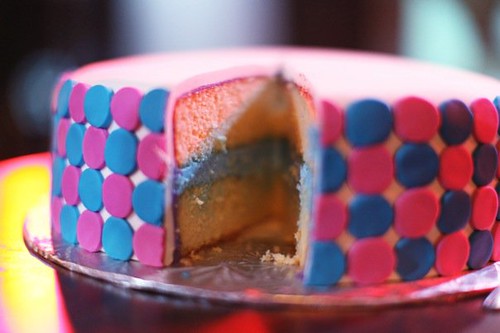
"Bakers are delivering big news. Expectant moms and dads have started a sweet tradition: They're asking bakeries, instead of their doctors, to reveal whether the baby they are having is a boy or girl. The doctor writes down the gender and seals it in an envelope, then the baker makes either a blue or pink cake and decorates it with gender-neutral icing. The parents--to-be cut the first slice and discover the secret. Queen of Cakes bakery in Edina, MN, now gets order for "baby cakes" a few times a month. Says owner Terri Leckas, "I feel like the fairy godmother."
Here are some pics we found of the aforementioned baby cakes. And if you watched last week's "Amazing Cakes" on WE tv, then you would have seen one of these done!!
Happy baking!
Christina
Wednesday, April 13, 2011
Wacky Cakes Wednesday!
Tuesday, April 12, 2011
Terrific Tool Tuesday: Silicone Molds!
Yesterday we featured First Impressions Molds LLC as our Spotlight vendor of the week, with the promise to tell you more about silicone molds today, so here we go.
Silicone molds are used with fondant and gum paste, as well as a myriad of other mediums, to create decorations for cakes. Pastry chefs like Duff Goldman, Lauri Ditunno, and others use them to make life easier when they need a specific type of decoration that can be difficult to make.
Purchasing silicone molds is the easiest way to go. Site like First Impressions specialize only in molds, but you can also get them at site like Global Sugar Art, NY Cake, and others. (See our list of favorite website in the right side bar of this site for more vendor suggestions.) The molds come in a host of shapes and sizes, so if you search enough, you should find just what you need.
To use a silicone mold is super easy. Here are how-to instructions courtesy of First Impressions:
How-to
"Take a piece of sugarpaste that you think will be enough to just fill the mold, knead it until it is smooth and roll it into a ball. Take a dusting puff* and dust the ball, then press it into the mold, making sure you capture all the detail and any undercuts*.
You can dust the top as you press the sugarpaste in if it begins to feel sticky. If you have excess paste after filling the mold you can either cut it off with a pair of scissors (careful not to clip the mold), pinch it off, or run a straight edge spatula across the top to remove the excess, then smooth it again.
If the mold is deep, highly detailed or has undercuts, you must place the filled mold into the refrigerator or freezer for 15-30 minutes depending on how deep the mold is to allow the sugarpaste to set firm and to make for easy de-molding.
De-molding:
After you have pressed your sugarpaste into the mold, you can simply pop the piece out by gently holding the mold with your thumbs on top and fingers on the bottom of the mold and flexing it out and up.
If you have placed the filled mold into the refrigerator or freezer simply remove it and de-mold, then place the finished piece on waxed paper to air dry.
* Dusting puff - fill the foot of one knee-high pair of pantyhose with a 1/4 cup of cornstarch, then tie it and cut off the excess, leaving about an inch extra at the top for holding onto.
* Undercuts - portions of the piece that are deeper into the bottom or side of the mold than the rest."
* Dusting puff - fill the foot of one knee-high pair of pantyhose with a 1/4 cup of cornstarch, then tie it and cut off the excess, leaving about an inch extra at the top for holding onto.
* Undercuts - portions of the piece that are deeper into the bottom or side of the mold than the rest."
If you search for a mold and just can't find what you want, perhaps you need something unique and specific to a project, then the way to go is by making your own mold. That is when a site like MYOM.com (Make Your Own Molds) comes in handy. There you can find mold making kits, videos, and supplies and accessories to get the job done.
Below are some molds that we own which make life easier, and even a couple we have on our wish list - that is, we wish we'd had them when we made a cake that featured just that decoration!!
Happy baking!
Christina & Meghan
| We own this mold and use it with isomalt to make realistic-looking gems when needed. |
| Where, oh where, was this mold last summer when we were attempting make an engagement ring topper for a cake?!?? |
| These drop beads make a beautifully elegant decoration! |
| Pearl borders have never been easier since we purchased this mold!! No more messy piping bags and aching hands! |
* Dusting puff - fill the foot of one knee-high pair of pantyhose with a 1/4 cup of cornstarch, then tie it and cut off the excess, leaving about an inch extra at the top for holding onto.
* Undercuts - portions of the piece that are deeper into the bottom or side of the mold than the rest."
Monday, April 11, 2011
Reflections of a cake decorator
Cake decorating shows are my secret passion. In fact, I record so many that my husband often marvels at how many there actually are on television!
I thoroughly enjoy watching the process of creating a cake from start to finish; of watching another artist hard at work on something about which they are passionate. There is never a time when I am viewing a show that I don't feel the inevitable pull to get up and make a cake of my own. My family benefits from this compulsion regularly and they actually encourage me to watch my shows so that I will get inspired to bake for them!
This evening I was sitting with some quiet time to myself (unheard of, I know!) while my husband was out with our eldest at softball practice and our two youngest were next door playing with friends. I was finally getting around to watching Food Network Challenge's "Last Cake Standing" (last season) and thoroughly enjoying the first episode.
Their first challenge was to create a cake that tells the story of who they are. The competitors - Michelle Bommarito, Bronwen Weber, James Roselle, Courtney Clark, Mary Maher, and Elissa Strauss - got to work on what I saw as essentially the story of their life, and I paused to ask myself what I would have done if I was one of them.
The answer was simple: a tall, ambitious cake with exquisite detail that represented my love of all things cake, perhaps with me in the forefront and my children avidly watching while my husband lending a hand as I worked on my creation. The cake would definitely be colorful, vibrant, and fun, much as I see myself.
And if taste were a judging criterion, it would taste out of this world!
Happy baking!
Christina
In the Spotlight: First Impressions Molds, LLC!
This week we are linking together our "In the Spotlight" feature with our "Terrific Tool" of the week. When we sat down to brainstorm what vendor we wanted to feature and the tool we wanted to share with you, these two just went together perfectly!
This week's spotlighted vendor is First Impressions Molds LLC.
According to their website, "First Impressions Molds uses only the highest quality silicone to create molds used for a variety of mediums. We offer an unparalleled selection of over 400 silicone molds at competitive prices and always with the best service." Best of all, their molds can be used in so many ways, the creative possibilities are endless: fondant, gum paste, candle, royal icing, hard candy, candy clay, plaster and bread, just to name a few!
A silicone mold can make life so much easier when you are decorating a cake (see tomorrow's post to find out how) and First Impressions is the leader in the industry offering quality products with a wide selection at prices that won't break the bank!
Happy baking!
Christina & Meghan
Saturday, April 9, 2011
Amazing Wedding Cakes - Sneak Peek of the *All-New* Episode this Sunday 4/10! (VIDEO)
Last week's episode was fabulous, complete with a snow storm, a tricky topsy-turvy cake, and a koala cake too! This week promises to be just as good.
Here's what's happening:
Two sisters, both engaged, convince Marianne and Lauren in Ohio to make competing cakes for their double engagement party. Which cake will outdo the other? A Minnesota couple celebrates the groom’s safe return from Afghanistan after a quickie marriage. With an added twist, the bride is pregnant, and only the couple knows the gender of the baby! Robin suggests they make the color of the actual cake under the fondant either blue or pink so that when the first slice is cut at the party, all their guests will learn whether the couple is having a boy or a girl!
Tune in for all new episodes of Amazing Wedding Cakes on Sundays at 10/9c on WE tv:
Here are some pics of the upcoming episode as well as a video clip too! Enjoy and be sure to tune in on Sunday!
Happy baking!
Christina & Meghan
Thursday, April 7, 2011
Tasty Thursday: Tres Leches Cake!
Christina's family is from Puerto Rico and as such, she was raised eating delicious comida criolla (AKA Puerto Rican food). One of her favorite desserts is Tres Leches (Three Milks) cake; even though it is not necessarily of Puerto Rican origin, it is still a popular dessert option at island restaurants.
Recently, when she was in Puerto Rico for her grandmother's funeral, Christina had a delicious version at a local bakery in Orocovis. She came home with it on her mind and decided sharing her recipe for it would be a great idea for one of our Tasty Thursday slots!
Tres Leches gets its name from the three different milks - sweetened condensed, evaporated, and whole - which gives it its richness and moistness. It can be a sweet cake, traditionally made with a large quantity of sugar and a meringue topping but this version uses much less sugar and fresh whipped cream instead, cutting back on calories and preparation time. Most recipes call for a light rum added to the milk syrup, which adds a nice adult flavor, although it can also be eliminated without sacrificing the taste. And unlike other cakes, this cake tastes better the next day, after it has set completely.
Here is the recipe Christina makes whenever she craves is and annually for the multicultural festival at a local elementary school her children attend. It comes from one of her favorite cookbooks called "Latin American Cooking Across the USA" by Himilce Novas and Rosemary Silva. Enjoy!
Happy baking!
Christina & Meghan
For the cake:
For the milk syrup:
For the whipped-cream topping:
1. Make the cake batter: sift together the cake flour and baking powder. Cream the sugar and the butter in a large mixing bowl with an electric mixer until well blended. Add the eggs and the vanilla extract, and beat until foamy. With a rubber spatula, gently fold in the dry ingredients, alternating with the milk, until the batter is smooth.
2. Pour the cake batter into a lightly greased 7 x 11 x 2-inch cake pan or baking dish, and bake on the middle rack in a preheated 350 degrees Farenheit oven for 30 minutes, or until a wooden toothpick inserted in the center comes out clean and the top springs back when gently pressed. Allow the cake to cool in the pan on a wire rack for 20 minutes, then invert it onto a serving platter. Pierce the cake with a fork in many places and allow it to cook completely.
3. Next make the syrup: Whisk all the syrup ingredients in a medium mixing bowl until well blended. Pour the syrup evenly over the cake and refrigerate the cake, covering in plastic wrap, for at least 3 hours.
Make the toppings: First chill the cream, a large mixing bowl, and beaters or a whisk in the refrigerator. Beat the cream in the chilled mixing bowl with an electric mixer or the whisk until it begins to thicken. Add the sugar and vanilla extract, and continue beating until stiff peaks form. Cover the top and side of the cake with the whipped cream topping, using a spatula or knife. Cut the cake and serve. You may also cut the cake first, and then garnish with whipped cream only those portions you plan to serve.
Serves 10 to 12
Recently, when she was in Puerto Rico for her grandmother's funeral, Christina had a delicious version at a local bakery in Orocovis. She came home with it on her mind and decided sharing her recipe for it would be a great idea for one of our Tasty Thursday slots!
| (Photo courtesy of Bobbyrica.com) |
Tres Leches gets its name from the three different milks - sweetened condensed, evaporated, and whole - which gives it its richness and moistness. It can be a sweet cake, traditionally made with a large quantity of sugar and a meringue topping but this version uses much less sugar and fresh whipped cream instead, cutting back on calories and preparation time. Most recipes call for a light rum added to the milk syrup, which adds a nice adult flavor, although it can also be eliminated without sacrificing the taste. And unlike other cakes, this cake tastes better the next day, after it has set completely.
Here is the recipe Christina makes whenever she craves is and annually for the multicultural festival at a local elementary school her children attend. It comes from one of her favorite cookbooks called "Latin American Cooking Across the USA" by Himilce Novas and Rosemary Silva. Enjoy!
Happy baking!
Christina & Meghan
Tres Leches Cake
For the cake:
- 1 1/2 cups cake flour
- 1 teaspoon baking powder
- 1 cup granulated sugar
- 1/2 cup (1 stick) unsalted butter, softened
- 5 large eggs
- 1/2 teaspoon pure vanilla extract
- 1/3 cup milk
For the milk syrup:
- 1 cup sweetened condensed milk
- 1 cup evaporated milk
- 1 cup whole milk
- 1 tablespoon light rum or your favorite liqueur (optional)
For the whipped-cream topping:
- 1 cup heavy cream
- 1 teaspoon granulated sugar
- 1/2 teaspoon pure vanilla extract
1. Make the cake batter: sift together the cake flour and baking powder. Cream the sugar and the butter in a large mixing bowl with an electric mixer until well blended. Add the eggs and the vanilla extract, and beat until foamy. With a rubber spatula, gently fold in the dry ingredients, alternating with the milk, until the batter is smooth.
2. Pour the cake batter into a lightly greased 7 x 11 x 2-inch cake pan or baking dish, and bake on the middle rack in a preheated 350 degrees Farenheit oven for 30 minutes, or until a wooden toothpick inserted in the center comes out clean and the top springs back when gently pressed. Allow the cake to cool in the pan on a wire rack for 20 minutes, then invert it onto a serving platter. Pierce the cake with a fork in many places and allow it to cook completely.
3. Next make the syrup: Whisk all the syrup ingredients in a medium mixing bowl until well blended. Pour the syrup evenly over the cake and refrigerate the cake, covering in plastic wrap, for at least 3 hours.
Make the toppings: First chill the cream, a large mixing bowl, and beaters or a whisk in the refrigerator. Beat the cream in the chilled mixing bowl with an electric mixer or the whisk until it begins to thicken. Add the sugar and vanilla extract, and continue beating until stiff peaks form. Cover the top and side of the cake with the whipped cream topping, using a spatula or knife. Cut the cake and serve. You may also cut the cake first, and then garnish with whipped cream only those portions you plan to serve.
Serves 10 to 12
Wednesday, April 6, 2011
Wacky Cakes Wednesday!
Okay, so can someone explain why you would bake a baby into a cake? That is just strange!!!
Happy baking!
Christina & Meghan
Happy baking!
Christina & Meghan
Subscribe to:
Posts (Atom)